Automating Browser Screenshots for Social Media using wcap and Pillow
I have two websites, ukealong.com and programminglanguages.info, with many pages showing graphics rendered with JavaScript. When I shared one of those pages on social media, I created a screenshot first, optimized the image and added the page URL as text to it. I realized that I don't want to do this manually for hundreds of pages and wrote some code to automate these tasks.
I looked at existing screenshot libraries for Python first, but the packages I tried didn't capture the dynamic graphics that I wanted to include on the screenshots. So I wrote a tool called wcap (web page capture) that is built on top of Selenium and geckodriver. It can be used as a command line tool or from within Python programs.
At the time of writing wcap allows you to set the dimensions of the screenshot and a wait time in seconds to ensure that page rendering has finished. Any form of image manipulation like cropping or adding text has to be done separately.
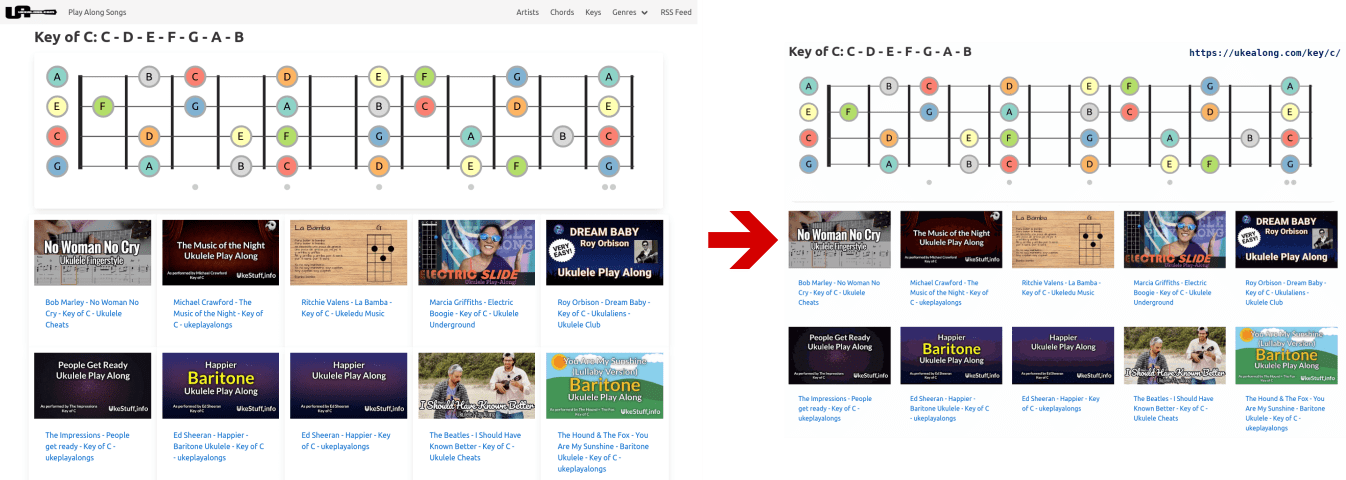
Below you find the code to create the social media image for the Key of C page on ukealong.com. The first step is to import the necessary libraries and set some display variables like margins and font size that are specific for the design and layout of the captured web page and the portion to show. My goal was to show the fretboard diagram and the first two rows of video preview images.
from PIL import Image, ImageDraw, ImageFont
from wcap import get_browser, capture

font_color = (0, 35, 102)  # Royal Blue
font_margin = 10
font_size = 18

margin_vertical = 45
margin_horizontal = 50
scale_factor = 0.8
Next we set the URL of the page and the file name for storing the image.
url = 'https://ukealong.com/key/c/'
file_name = 'img/c.png'
You probably wouldn't read this, if you wanted to create a screenshot for a single page. So for creating multiple images, you can put the code that comes after creating the browser object in a function and pass URL and image name as parameters. The purpose of the get_browser() function in the wcap package is to make a single browser instance usable for multiple screen captures.
browser = get_browser()
capture(browser, url, file_name, dimensions='1500x1100', wait=5)
The next steps are resizing and cropping the downloaded image. In the call of resize the resample parameter is set to Image.BICUBIC. The default resampling filter didn't work well, so this is something you may need to adjust if you want to make it work for a different page.
im = Image.open(file_name)
w, h = im.size
resized = im.resize((int(w * scale_factor), int(h * scale_factor)), resample=Image.BICUBIC)
resized_w, resized_h = resized.size
cropped = resized.crop((margin_horizontal, margin_vertical, resized_w - margin_horizontal, resized_h))
Now that the image is reduced to the desired size and portion of the page, the web page URL is added as text to the top right corner. The first parameter of the ImageDraw.text method is a tuple specifying the x and y coordinates of the top left corner of the text relative to the top left corner of the image. To make the text fit the x value is calculated from the width of the image and the text given the font family and size to use.
font = ImageFont.truetype('DejaVuSansMono-Bold.ttf', font_size)
font_w, font_h = font.getsize(url)
text_x = cropped.size[0] - font_w - font_margin
text_y = font_margin
ImageDraw.Draw(cropped).text((text_x, text_y), url, fill=font_color, font=font)
In the final statement the quantize method is called to reduce the file size of the image. 256 is the number of colors in the result image. It is the highest possible value, because of the video previews. If you have very few colors on your page, you can set a lower value. If you have lots of colors, calling quantize may not be an option at all because of the loss of information.
I prefer fast load times over image quality, especially since these images are meant as previews of web pages and are not intended for print. The unedited file in this case is almost 10 times bigger than the final one.
cropped.quantize(256).save(file_name)
Below you can see how the original screenshot was changed:
The final step is to set the og:image meta property on the corresponding web page:
<meta property="og:image" content="https://ukealong.com/img/key/c.png">
There are other meta tags you can set for specific social media sites. I like to stick to the one above and not bloat the source code of the web page. It works on the relevant sites and will show the image as the preview image when someone shares the URL of the web page.
In this article I showed how I automated the creation of social media images for the key and chord pages on ukealong.com. I could reuse this code with different parameters for the language pages on programminglanguages.info and hope other people who want to accomplish something similar can make use of wcap and the image editing code as well.
Featured Merch

Latest Posts
- Social Media Dimensions Cheat Sheet 2026
- How to Check if an IP Address is Blocked on Linux
- How to Inspect All Cron Jobs on a Linux System: A Sysadmin's Guide
- Building a 3D Elevation Photo Diary with deck.gl
- Thunderbird Keeps Threading Emails? Here's the Fix
Featured Book

Subscribe to RSS Feed
Published by Ramiro Gómez on . Subscribe to the Geeksta RSS feed to be informed about new posts.
Tags: automation code tutorial python selenium
Disclosure: External links on this website may contain affiliate IDs, which means that I earn a commission if you make a purchase using these links. This allows me to offer hopefully valuable content for free while keeping this website sustainable. For more information, please see the disclosure section on the about page.